Material Selection and Sourcing: Rubik’s Cube Costume Diy
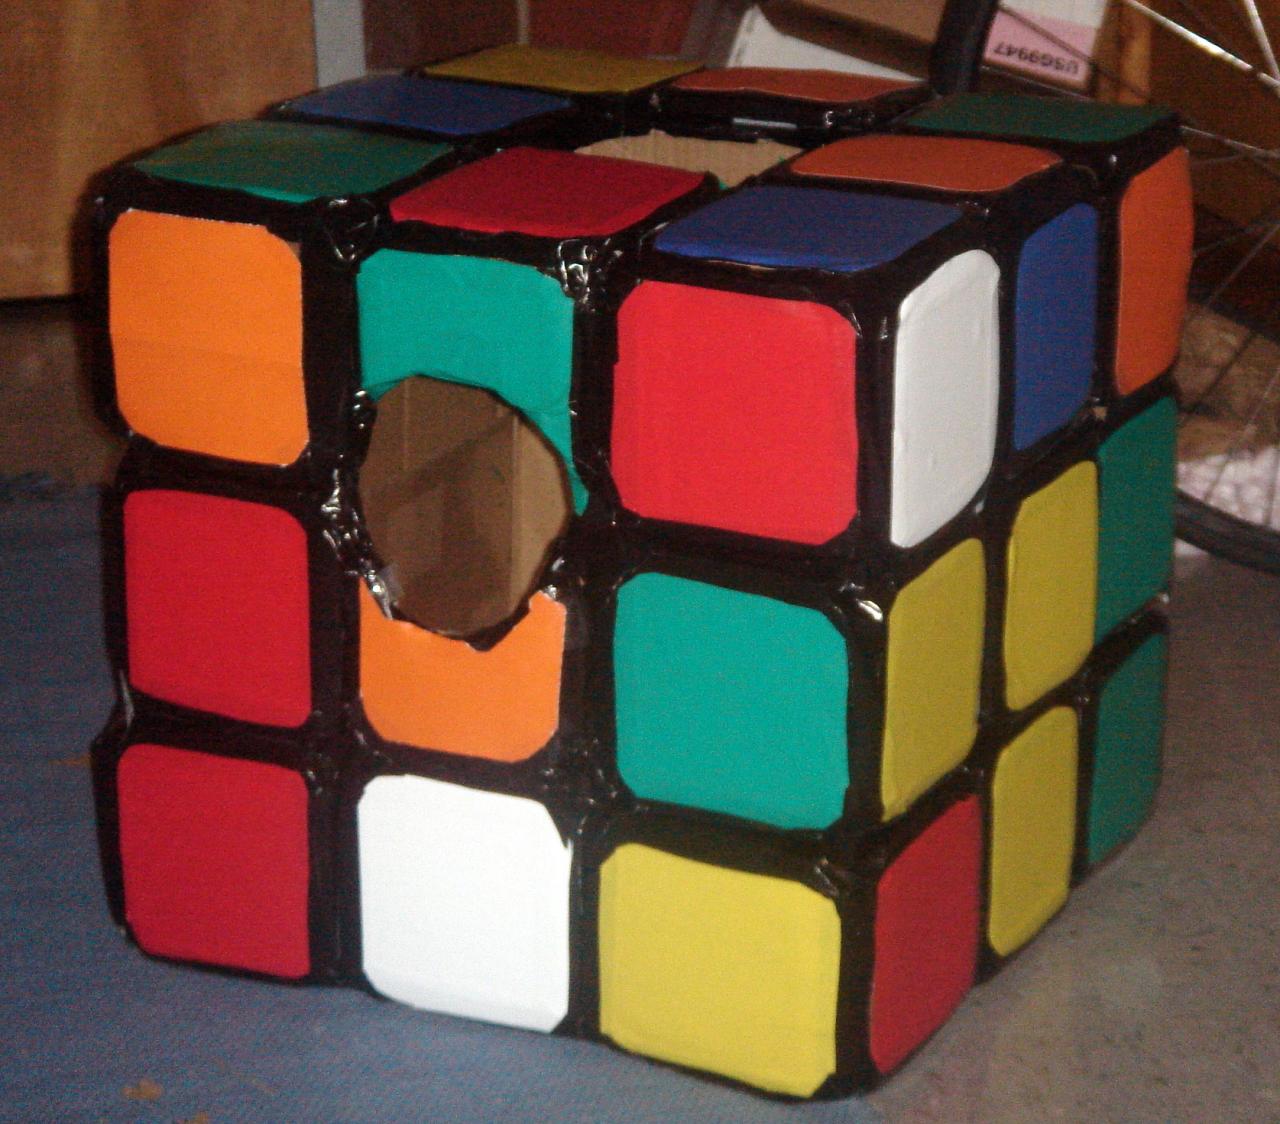
Rubik’s cube costume diy – Crafting a Rubik’s Cube costume requires careful consideration of materials to achieve the desired look and durability. The choice depends on your budget, skill level, and the level of detail you want to achieve. Let’s explore some options and how to source them.
Material Options for a Rubik’s Cube Costume
Three materials stand out as viable options for building a Rubik’s Cube costume: cardboard, foam board, and fabric. Each offers unique advantages and disadvantages in terms of construction, durability, and visual appeal.
- Cardboard: Cardboard is readily available, inexpensive, and easy to cut and manipulate. Its lightweight nature makes it comfortable to wear for extended periods. However, cardboard is not very durable and can easily bend or crease, potentially compromising the costume’s structural integrity. It’s also not the most visually appealing option, requiring significant painting and finishing to achieve a polished look.
- Foam Board: Foam board offers a more rigid and durable structure compared to cardboard. It’s relatively lightweight and holds its shape well, making it ideal for creating sharp edges and precise details. However, foam board can be more expensive than cardboard and requires more precise cutting tools. It also may not be as flexible, making it less comfortable for intricate designs.
- Fabric: Fabric, particularly a stiff material like felt or canvas, provides a flexible and lightweight option that allows for a more seamless and visually appealing costume. It can be sewn together to create a more refined look and feel. However, fabric requires sewing skills and may be more time-consuming to construct. It also might require additional support structures (like cardboard or foam board) to maintain its shape.
Tools and Equipment
The tools and equipment required vary depending on the chosen material. Having the right tools ensures a smooth and efficient construction process.
- Cardboard Costume: Ruler, pencil, utility knife or box cutter, scissors, hot glue gun, paint (acrylic is recommended), paintbrushes, sealant (optional).
- Foam Board Costume: Ruler, pencil, utility knife or craft knife (with multiple blades), cutting mat, hot glue gun, sandpaper (for smoothing edges), paint (acrylic is recommended), paintbrushes, sealant (optional).
- Fabric Costume: Sewing machine (or needle and thread), fabric scissors, pins, measuring tape, pattern making tools (optional), fabric paint or markers, iron and ironing board (for ironing seams).
Sourcing Materials and Equipment
Acquiring the necessary materials and equipment is straightforward, utilizing both online and offline resources.
Offline sourcing involves visiting local craft stores like Michaels, Hobby Lobby, or Joann Fabrics. These stores usually stock a wide variety of materials, including cardboard, foam board, various fabrics, paints, glue, and basic craft tools. Hardware stores are another good option for sourcing cutting tools and sealant.
So, you’re thinking Rubik’s Cube costume? Pretty ambitious, right? Need some inspiration for crafting those crazy colors? Well, maybe check out the level of detail in this paw patrol skye costume diy – seriously impressive sewing skills there. That kind of dedication might give you some ideas for tackling your own Rubik’s Cube masterpiece.
It’s gonna be epic, or a total disaster, either way, it’ll be a story to tell.
Online sourcing offers a broader selection and often competitive pricing. Websites like Amazon, Etsy, and specialized craft supply websites offer a vast range of materials and tools, allowing for convenient comparison shopping and delivery directly to your doorstep. Remember to check reviews and compare prices before making a purchase.
Construction Techniques
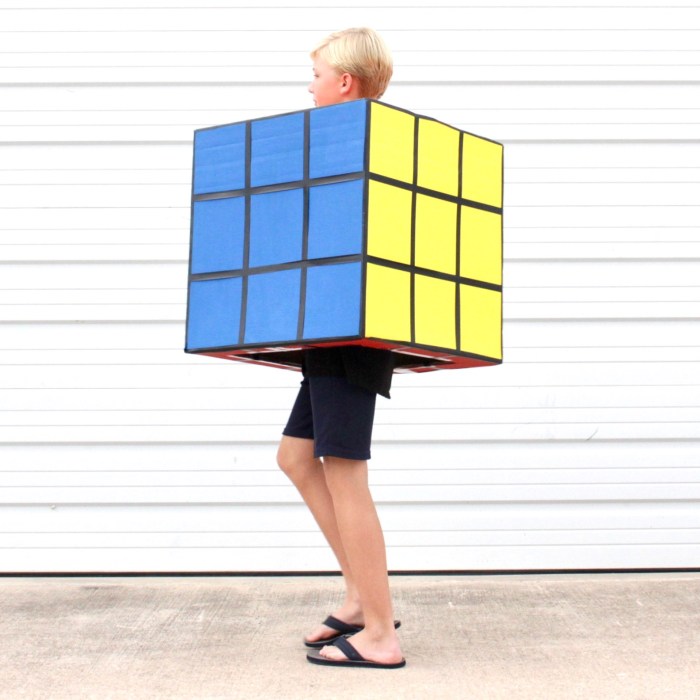
Building a Rubik’s Cube costume requires careful planning and execution. The choice of material significantly impacts the construction process, influencing both the final look and the level of difficulty. We’ll explore three primary methods: using cardboard, foam board, and fabric. Each approach offers unique advantages and challenges.
Cardboard Rubik’s Cube Construction
Constructing a Rubik’s Cube costume from cardboard is a cost-effective and relatively accessible method. The process can be broken down into distinct phases.
- Pattern Creation: Begin by creating precise templates for each face of the cube. Accurate measurements are crucial for a well-proportioned costume. Consider using graph paper to draw the squares, ensuring consistent sizing. Remember to account for overlaps and seams where the faces will join. You can easily find Rubik’s Cube templates online to adapt and scale to your desired size.
- Cutting: Carefully cut out the templates from sturdy cardboard. A sharp utility knife or craft blade will yield clean cuts. For added durability, consider using multiple layers of cardboard for each face. This is especially important for larger cube designs.
- Assembly: Connect the faces using strong adhesive, such as hot glue or strong craft glue. Ensure the seams are aligned precisely to create a seamless cube. Consider reinforcing the seams with additional strips of cardboard or tape for added strength. You can create tabs or slots on the edges of the cardboard pieces to help with the assembly process, making it easier to attach the faces together securely.
- Finishing: Once the cube is assembled, paint each face its corresponding color. Use acrylic paints for a vibrant, long-lasting finish. Allow ample drying time between coats. To add further detail and realism, consider adding black lines between the smaller squares to mimic the Rubik’s Cube’s grid. You could also add straps and padding for comfort.
Foam Board Rubik’s Cube Construction
Foam board provides a lighter and potentially more rigid alternative to cardboard.
- Pattern Creation: Similar to the cardboard method, create accurate templates for each face. The lighter weight of foam board may allow for slightly more intricate designs.
- Cutting: Use a sharp craft knife or utility knife to cut the foam board. A cutting mat will protect your work surface and ensure cleaner cuts. Foam board is easier to cut than cardboard, reducing the risk of jagged edges.
- Assembly: Foam board can be assembled using strong adhesive, such as hot glue or construction adhesive. Consider using additional supports, such as dowels or wooden sticks, to reinforce the corners and edges for enhanced stability. This will ensure that the cube maintains its shape and does not easily collapse.
- Finishing: Paint the foam board faces with acrylic paints, allowing sufficient drying time between coats. Foam board may require a primer coat to ensure better paint adhesion.
Fabric Rubik’s Cube Construction
A fabric Rubik’s Cube costume offers a softer, more flexible approach.
- Pattern Creation: Create patterns for each face, considering seam allowances. This method requires more sewing expertise than the previous two.
- Cutting: Cut the fabric pieces according to the patterns. Use fabric scissors for clean cuts.
- Assembly: Sew the fabric pieces together, paying close attention to seam allowances. Reinforce seams where necessary. Consider using interfacing to add structure to the fabric.
- Finishing: Once sewn, paint the fabric squares with fabric paint. This requires a different technique and paint type than the previous methods. Alternatively, use pre-colored fabric. Padding may be added for comfort and to give the cube a more three-dimensional appearance.
Troubleshooting and Modifications
Building a Rubik’s Cube costume is a rewarding project, but like any DIY endeavor, it presents its share of challenges. From sticky situations with hot glue to unexpected structural issues, knowing how to anticipate and overcome these hurdles is key to a successful (and wearable!) final product. This section Artikels common problems and offers practical solutions to ensure your costume is both impressive and comfortable.
Common Construction Challenges and Solutions
Several issues frequently arise during the construction of a Rubik’s Cube costume. One common problem is achieving the correct size and shape of the cube sections. Precise measurements and careful cutting are crucial to ensure the panels fit together snugly and create a cohesive cube shape. Using templates and double-checking measurements before cutting any material is highly recommended.
Another frequent challenge involves the securing of the panels. Hot glue can be messy and prone to leaking, potentially ruining the fabric. A solution is to use a low-temperature glue gun and apply the glue in small, controlled amounts, allowing it to set before applying more. For a stronger and cleaner bond, consider using fabric glue in conjunction with hot glue, or exploring alternative fastening methods such as Velcro or strong fabric tape.
Finally, ensuring the costume is comfortable and allows for movement is vital. Overly bulky or stiff materials can restrict movement, leading to discomfort. Selecting lightweight materials and incorporating flexible joints between panels are essential considerations.
Adapting the Costume to Different Body Types and Sizes, Rubik’s cube costume diy
Adapting the Rubik’s Cube costume to various body types and sizes requires careful planning and adjustments to the pattern. For smaller individuals, scaling down the pattern proportionally is essential. This involves reducing the size of each cube face while maintaining the relative proportions. For larger individuals, increasing the size of the pattern proportionally is necessary. This may require using larger pieces of fabric or joining multiple pieces together to create the larger cube faces.
The use of adjustable straps or fasteners such as Velcro can further enhance the adaptability of the costume to different body sizes. Consider incorporating elastic or adjustable waistbands for a comfortable fit around the torso. For individuals with wider shoulders or hips, adjustments to the pattern might involve adding extra fabric panels or altering the seam lines to accommodate a broader frame.
Repairing Common Issues
Despite careful construction, some issues might arise after the costume is completed. Broken pieces, often caused by accidental damage or stress on the seams, are a common concern. For minor breaks in the fabric, fabric glue or a strong sewing stitch can often effectively repair the damage. Loose joints, often caused by insufficient glue or improper alignment during construction, can be reinforced by applying additional glue or using fabric tape to secure the connection.
If the problem is severe, it might be necessary to carefully disassemble the affected area and reassemble it, ensuring a stronger bond this time. Remember to test the strength of the repair before wearing the costume to prevent further damage.
FAQ
How much will this costume cost?
The cost varies greatly depending on the materials you choose and the complexity of your design. A simple cardboard costume could be relatively inexpensive, while a more elaborate design using specialized fabrics or electronics could be more costly.
How long will it take to make the costume?
The construction time depends on your chosen design and your crafting experience. A simple design might take a weekend, while a more intricate costume could take several weeks.
Can I make this costume with limited sewing skills?
Yes, you can. Cardboard and foam board designs require minimal sewing, while fabric designs offer varying levels of sewing complexity depending on the chosen pattern and design.
What if I make a mistake during construction?
Don’t worry! Mistakes are part of the learning process. Many mistakes can be easily corrected with careful planning and attention to detail. Refer to the troubleshooting section of this guide for assistance.

